
I'm sure that someone has posted this before (maybe even several people, in fact), but last night a new member PMed me after looking at pictures of my XD, asking what process I had used to fill in the engravings. I responded in great detail regarding the process I used, and felt that it would be worthy to post here for others to use or get ideas from. Here we go:
(The original question was asked by Moe C. - thanks for giving me the excuse to write this up, Moe!)
Well Moe, you have two options, one being white laquer stick, and the other being white crayon, which I used. The obvious advantages to using the crayon are A) its cheap - everyone has a pack of crayons laying around; and B) it's not permanent, so if you don't care for the way it looks or you screw up, all you need is a lighter and a rag, or a soft bristle brush and it wipes right out.
The technique varies from person to person, but here's my version. First of all, clear the weapon. Check the weapon to ensure that it's clear. Check it again. Remove all ammo from the room, and store it safely. Once you are certain that the gun is unloaded and there is no ammo nearby, strip it so that you have only the slide in front of you (barrel and recoil guide rod/spring removed).
Take a lighter of some type and gently heat the slide in the areas that you'd like to fill in. A jet-flame type lighter works great for this, as you can control the heat a little easier.
EDIT AND DISCLAIMER REGARDING JET FLAME LIGHTERS:
A forum member contacted me today, and stated that he managed to marr his slide using a jet-flame lighter. He has a slightly older XD with the Bruniral finish. At this point, I'm going to recommend that anyone who isn't experianced with metal work/welding, and the charecteristics of applying heat to a metal surface, NOT use a jet flame lighter or torch of any kind, especially on a gun with the Bruniral finish. Use a regular Bic-type cigarette lighter - it might take a little longer, but it wont get hot enough to damage your slide. If you do decide to use a jet flame, DO NOT let the tip of the flame touch the surface of the slide. Keep the flame at least 1/2" - 1" above the surface to avoid damage - of course, this varies depending on your lighter and how strong it is. Use your discretion, please.
The reason behind using a lighter is that crayon is wax based - by heating the slide, the crayon melts when you apply it, allowing it to actually "flow" into the engravings, eliminating air pockets and creating a smoother finish. Keep in mind that because the crayon is wax based, it doesnt take a whole lot of heat to get it flowing. Too hot, and you'll make a big mess real quick! It's not hard to clean up, but can be time consuming becasue it re-hardens pretty fast. Obviously you're going to have a little slop, theres no way to aviod it or perfectly control the crayon in liquid form; the idea is to keep the slop to a minimum.
Now, once you have the engravings filled in, let the crayon harden. I generally put the slide in the freezer for about ten minutes or so for each section of the slide that I do...remember that the slide is made of metal and will conduct heat, so if you try to do them all at once, you'll just have a melted mess of crayon everywhere - the slide will get WAY too hot, and the slightest touch when its like this will pull the color out of the engravings and smear it. Everywhere. Ask me how I know.
I have heard that some people prefer to use a hair dryer/heat gun for this process and bypass the lighter altogether. I actually tried this with another gun I own and it zapped way too much heat into the slide, way too quickly. It worked fine for doing one section of the engravings, but the whole slide got really hot as opposed to just the one section I wanted to work with, so it increased the amount of cooling time needed between sections. YMMV.
Repeat the process for all the engravings that you want to fill, and once you have the last set of markings done, stick the gun back in the freezer for a while to make sure the slide is nice and cool. At this point, you can move on to the clean up phase. I ususally start by taking a piece of cardboard and scraping the excess crayon off of the surface. The jet flame helps alot here - you can very LIGHTLY warm up (not melt!) the outer layer of goop to scrape it off with the cardboard. Once the majority of the excess is removed, move on to a piece newspaper/computer printer paper dabbled with a little gun oil to get the rest of it off. DO NOT use any kind of rag for this part of the process - the little threads and fibers will reach right down into the engravings and pull the coloring out. Newspaper and cardboard and the like are much flatter, so to speak, and can be rubbed over the engravings without much risk. Just use the least amount of pressure you need to get the job done.
I'd say in about an hour (give or take depending on how much heat you applied) the crayon is completely back to normal, and you can clean the gun normally with your rags and oils. Obivously you don't want to spend too much time on the engravings with a rag, but as long as the crayon isn't warm, it's pretty robust. Besides, most of the time the outside of the gun just gets a light wipedown anyway, so it's not a big deal.
I'm sorry this got so long...it might sound like an intimidating process but really it's not...it just takes time. Be patient with it and be sure to let the slide cool down enough between each step, and it will turn out great! Send or post some pics when you're done!
Good luck,
JB
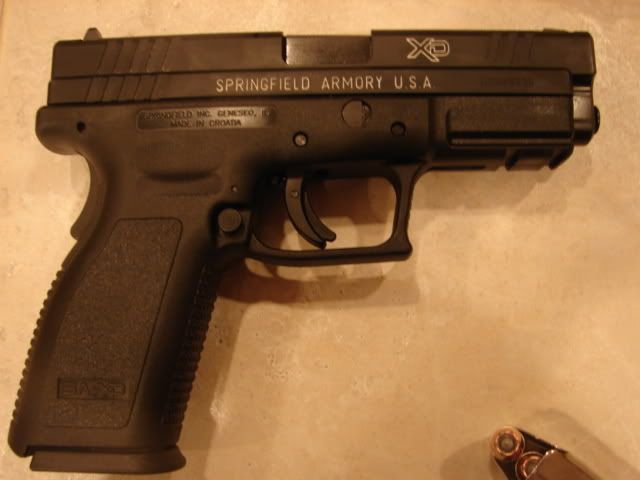
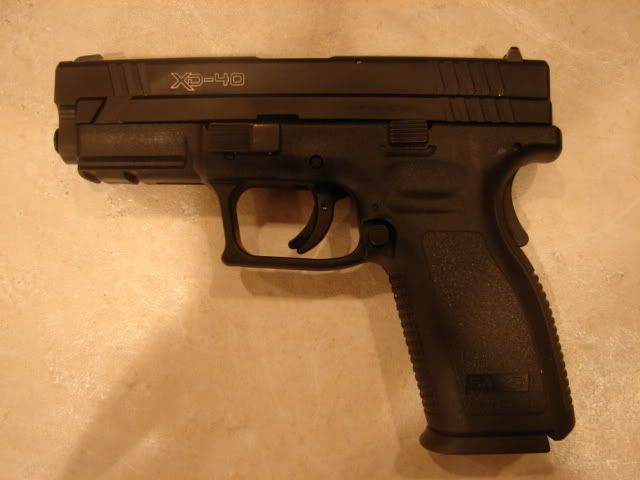
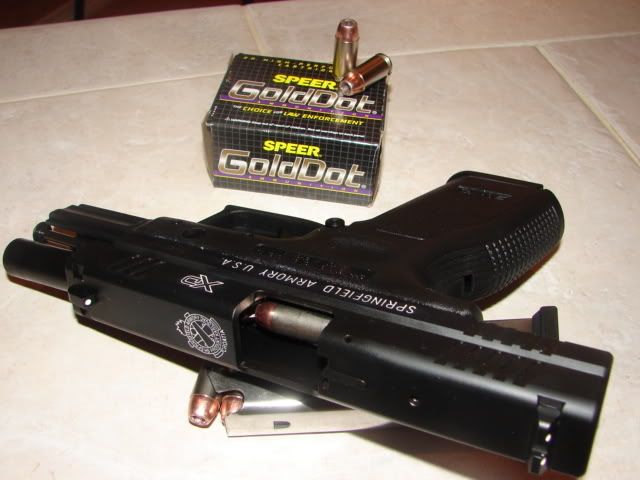
Here are a few pictures of the finished product:
![Image]()
![Image]()
![Image]()
![Image]()
Edit: It should be noted that this process will work with any color crayon, not just white. I know I've seen a couple people use red, which looks really cool as well. Experiment and post, new ideas are always neat to see!
(The original question was asked by Moe C. - thanks for giving me the excuse to write this up, Moe!)
Well Moe, you have two options, one being white laquer stick, and the other being white crayon, which I used. The obvious advantages to using the crayon are A) its cheap - everyone has a pack of crayons laying around; and B) it's not permanent, so if you don't care for the way it looks or you screw up, all you need is a lighter and a rag, or a soft bristle brush and it wipes right out.
The technique varies from person to person, but here's my version. First of all, clear the weapon. Check the weapon to ensure that it's clear. Check it again. Remove all ammo from the room, and store it safely. Once you are certain that the gun is unloaded and there is no ammo nearby, strip it so that you have only the slide in front of you (barrel and recoil guide rod/spring removed).
Take a lighter of some type and gently heat the slide in the areas that you'd like to fill in. A jet-flame type lighter works great for this, as you can control the heat a little easier.
EDIT AND DISCLAIMER REGARDING JET FLAME LIGHTERS:
A forum member contacted me today, and stated that he managed to marr his slide using a jet-flame lighter. He has a slightly older XD with the Bruniral finish. At this point, I'm going to recommend that anyone who isn't experianced with metal work/welding, and the charecteristics of applying heat to a metal surface, NOT use a jet flame lighter or torch of any kind, especially on a gun with the Bruniral finish. Use a regular Bic-type cigarette lighter - it might take a little longer, but it wont get hot enough to damage your slide. If you do decide to use a jet flame, DO NOT let the tip of the flame touch the surface of the slide. Keep the flame at least 1/2" - 1" above the surface to avoid damage - of course, this varies depending on your lighter and how strong it is. Use your discretion, please.
The reason behind using a lighter is that crayon is wax based - by heating the slide, the crayon melts when you apply it, allowing it to actually "flow" into the engravings, eliminating air pockets and creating a smoother finish. Keep in mind that because the crayon is wax based, it doesnt take a whole lot of heat to get it flowing. Too hot, and you'll make a big mess real quick! It's not hard to clean up, but can be time consuming becasue it re-hardens pretty fast. Obviously you're going to have a little slop, theres no way to aviod it or perfectly control the crayon in liquid form; the idea is to keep the slop to a minimum.
Now, once you have the engravings filled in, let the crayon harden. I generally put the slide in the freezer for about ten minutes or so for each section of the slide that I do...remember that the slide is made of metal and will conduct heat, so if you try to do them all at once, you'll just have a melted mess of crayon everywhere - the slide will get WAY too hot, and the slightest touch when its like this will pull the color out of the engravings and smear it. Everywhere. Ask me how I know.
I have heard that some people prefer to use a hair dryer/heat gun for this process and bypass the lighter altogether. I actually tried this with another gun I own and it zapped way too much heat into the slide, way too quickly. It worked fine for doing one section of the engravings, but the whole slide got really hot as opposed to just the one section I wanted to work with, so it increased the amount of cooling time needed between sections. YMMV.
Repeat the process for all the engravings that you want to fill, and once you have the last set of markings done, stick the gun back in the freezer for a while to make sure the slide is nice and cool. At this point, you can move on to the clean up phase. I ususally start by taking a piece of cardboard and scraping the excess crayon off of the surface. The jet flame helps alot here - you can very LIGHTLY warm up (not melt!) the outer layer of goop to scrape it off with the cardboard. Once the majority of the excess is removed, move on to a piece newspaper/computer printer paper dabbled with a little gun oil to get the rest of it off. DO NOT use any kind of rag for this part of the process - the little threads and fibers will reach right down into the engravings and pull the coloring out. Newspaper and cardboard and the like are much flatter, so to speak, and can be rubbed over the engravings without much risk. Just use the least amount of pressure you need to get the job done.
I'd say in about an hour (give or take depending on how much heat you applied) the crayon is completely back to normal, and you can clean the gun normally with your rags and oils. Obivously you don't want to spend too much time on the engravings with a rag, but as long as the crayon isn't warm, it's pretty robust. Besides, most of the time the outside of the gun just gets a light wipedown anyway, so it's not a big deal.
I'm sorry this got so long...it might sound like an intimidating process but really it's not...it just takes time. Be patient with it and be sure to let the slide cool down enough between each step, and it will turn out great! Send or post some pics when you're done!
Good luck,
JB
Here are a few pictures of the finished product:

Edit: It should be noted that this process will work with any color crayon, not just white. I know I've seen a couple people use red, which looks really cool as well. Experiment and post, new ideas are always neat to see!


